I needed a project.
We are moved out of our house and are currently in an apartment while on the search for a new home (Short Sales are not a fast or easy process, and in today's market 9 out of every 10 houses are a short sale!!!).
90% of our worldly goods are in storage while my family of 6 is living cozily in a 1,200 square foot apartment. We only kept the essential out for the apartment since it's temporary. For me that includes all of my craft supplies. (Thank goodness our apartment has a garage!)
Living in such cramped quarters really hampers my ability to craft, and after a month and a half, my brain was screaming that it needed to create.
Heres what I did.
I got a small can of miss tint paint at Lowes ($1.25 score! and I liked the dark grey color) and pulled out my transfer paper.
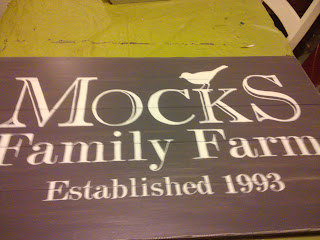
After measuring the size of my project, I figured out my design and text on Photoshop. I chose to use our last name and the year we were married. Then took the file down to my local Office Max and had them print out a copy on their big printer. This only cost me around $3. Check your local store to see if they have the big machine. Not all of them do.
Next, I painted my board. I got this board at my local Deseret Industries (A local thrift store) for $8. Originally it had a Las Vegas graphic on it compete with scantily clad showgirls. I liked it, because it had grooves in the board to make it look like planks. I don't have a picture of it in it's original form, because I threw a coat of white paint on it while working on another project shortly after I bought it. (I didn't need my girls walking out and seeing it every time they went in the garage :)
I painted the board with two coats of my new grey paint. It wasn't completely covered, there were still streaks of white showing through. But since I was going to sand it afterwards anyways I wasn't concerned.
Next, I carefully measure my image to make sure it was centered and leveled on the board. When it was just right, I taped it down with painters tape, placed the transfer paper in between the paper and the board, and traced away. (Sorry, no picture for this)
Two tips I've learned about using transfer paper:
1. Make sure to place the correct side of the transfer paper down. There is nothing worse than getting everything traced and finding out that you traced it onto the back of the paper instead of the board!
2. Check the board to make sure that you didn't miss transfering anything, and that you can see the trace lines easily before you remove the paper. It is really hard to get the paper realigned once you remove it.
Yes, I've learned both of these lessons the hard way.
Next, I took a few hours to hand paint the image onto the board. This takes a steady hand, but it's pretty much just a matter of painting in the lines.
Finally, I attacked it with 100 grit and 150 grit sandpaper.
Here's the almost finished project. I still need to add a couple of coats of polyurethane, but it's currently buried somewhere in the great abyss of our storage unit.
Who knows where it will eventually find a home. If I can't find a place in our new home, it may end up hanging on a fence in my garden.
I am currently creatively fulfilled. We'll see how long it lasts...


